
Most organizations get PKI wrong on the first try. They either build a single CA that does everything (and becomes a single point of failure), or they over-engineer a 3-tier hierarchy they’ll never actually need. The sweet spot for 90% of enterprises is a 2-tier PKI — and this guide shows you exactly how to build one.
No fluff. No “it depends.” Just the architecture, the commands, and the decisions you’ll need to make before your security team starts asking uncomfortable questions.
Why 2-Tier and Not 1-Tier or 3-Tier?
Here’s the thing nobody tells you upfront: a 1-tier PKI (single CA doing everything) works fine until it doesn’t. The moment that CA is compromised, your entire trust chain collapses. Every certificate you’ve ever issued is now suspect. Every server, every user, every device — all of it.
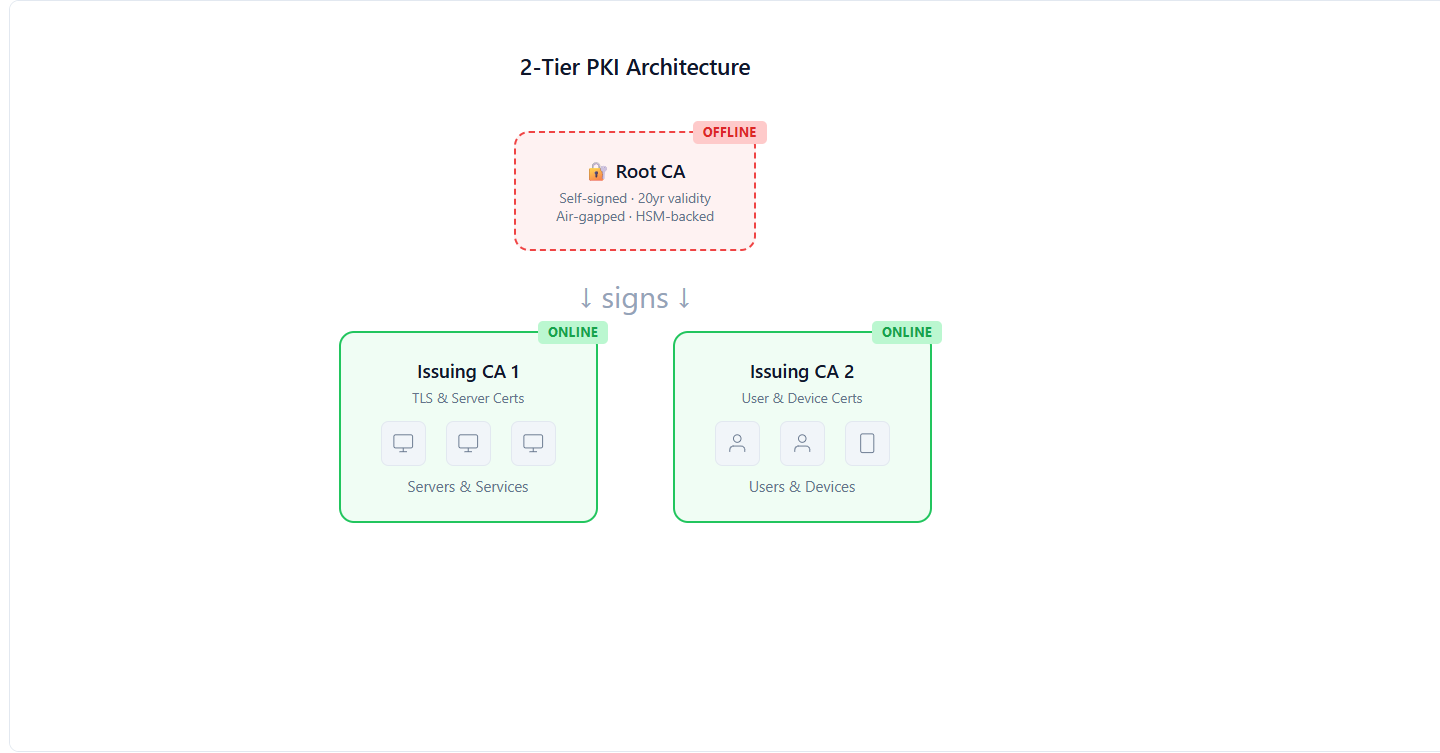
A 2-tier PKI separates the Root CA (which holds the master keys) from the Issuing CA (which does the daily work of signing certificates). The Root CA stays offline — literally powered off, locked in a safe, touched maybe twice a year. The Issuing CA handles the volume.
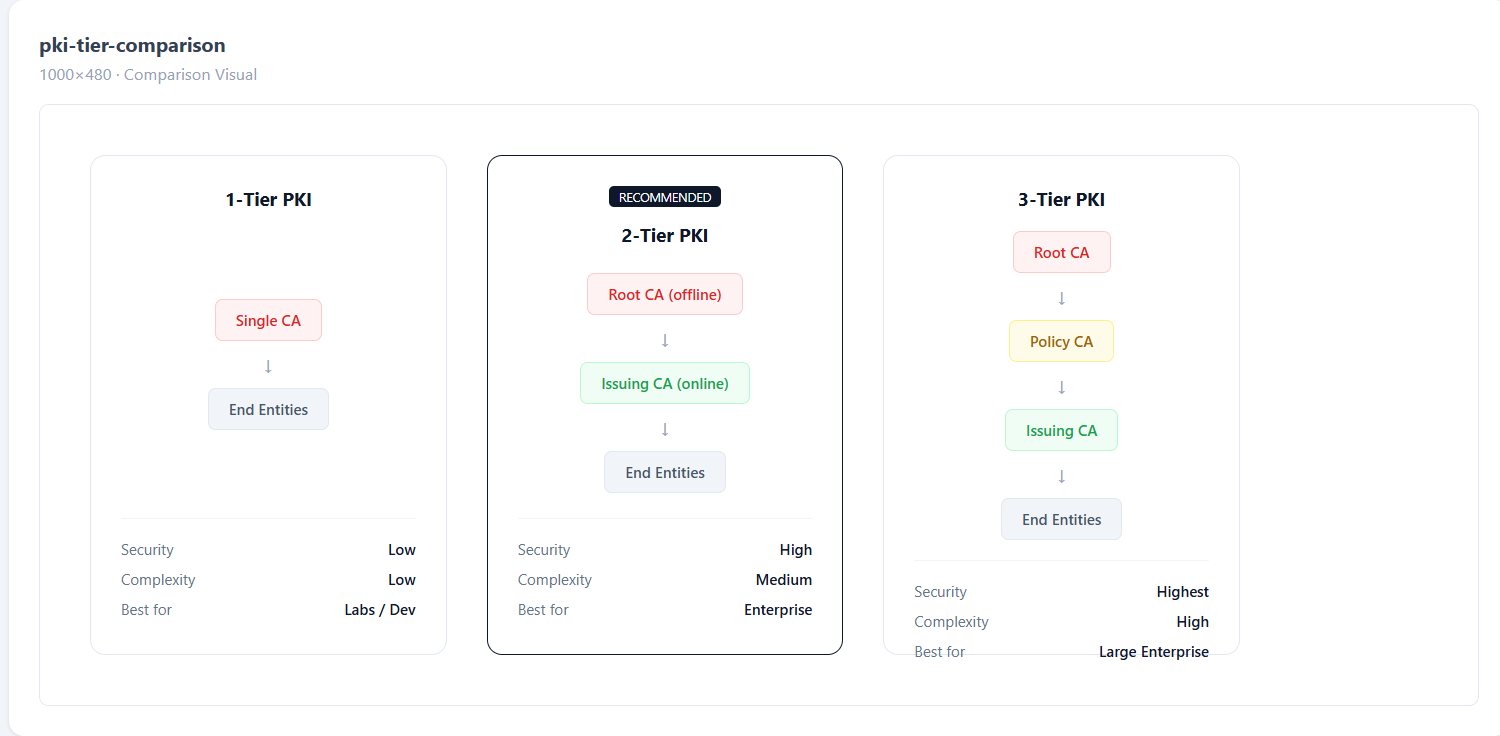
1-Tier PKI: Simple. Dangerous. One compromise = game over.
2-Tier PKI: Root offline, Issuing CA online. Compromise the Issuing CA? Revoke it, spin up a new one, re-issue. Root stays safe.
3-Tier PKI: Adds a “Policy CA” layer between Root and Issuing. Useful for massive organizations with multiple business units needing different certificate policies. Overkill for most.
If you have fewer than 50,000 certificates to manage, 2-tier is your answer.
The Architecture: What You’re Actually Building
Let’s be specific about what a 2-tier PKI looks like in practice:
Root CA (Tier 1)
- Runs on a hardened, air-gapped machine (no network connection, ever)
- Signs only the Issuing CA certificate(s) and CRLs
- Powered on maybe 2-4 times per year
- Key stored on HSM or at minimum an encrypted USB in a physical safe
- Validity period: 20-25 years
- This is your crown jewel. Treat it like nuclear launch codes.
Issuing CA (Tier 2)
- Runs on a server connected to your network
- Signs end-entity certificates (TLS, user auth, code signing, etc.)
- Handles all the automation, ACME, SCEP, EST protocols
- Validity period: 5-10 years (must be shorter than Root)
- This is your workhorse. It handles thousands of cert requests daily.
End Entities
- Servers, users, devices, workloads
- Get their certificates from the Issuing CA
- Never interact with the Root CA directly
- Validity: 90 days to 2 years depending on policy
Step-by-Step: Building the Root CA
I’m going to walk through this using OpenSSL on a Linux machine. If you’re using Microsoft AD CS or EJBCA, the concepts are identical — only the commands change.
Prepare the Air-Gapped Machine
This machine should never touch a network. Install a minimal Linux distro from a USB drive. No WiFi card, no Ethernet cable, no Bluetooth. Paranoid? Good. That’s the point.
# Create the directory structure
mkdir -p /root/ca/{certs,crl,newcerts,private,csr}
chmod 700 /root/ca/private
touch /root/ca/index.txt
echo 1000 > /root/ca/serial
echo 1000 > /root/ca/crlnumber
Generate the Root CA Private Key
This is the most important key in your entire infrastructure. If this leaks, everything is compromised.
# Generate a 4096-bit RSA key (or use EC P-384 for modern deployments)
openssl genrsa -aes256 -out /root/ca/private/root-ca.key 4096
chmod 400 /root/ca/private/root-ca.key
Use a strong passphrase. Write it down. Put it in a sealed envelope in a physical safe. Not a password manager — a physical safe. Two different people should each know half the passphrase.
Create the Root CA Configuration
# /root/ca/openssl-root.cnf
[ca]
default_ca = CA_default

[CA_default]
dir               = /root/ca
certs             = $dir/certs
crl_dir           = $dir/crl
new_certs_dir     = $dir/newcerts
database          = $dir/index.txt
serial            = $dir/serial
private_key       = $dir/private/root-ca.key
certificate       = $dir/certs/root-ca.crt
crlnumber         = $dir/crlnumber
crl               = $dir/crl/root-ca.crl
default_md        = sha384
default_days      = 7300
default_crl_days  = 180
policy            = policy_strict

[policy_strict]
countryName             = match
stateOrProvinceName     = match
organizationName        = match
commonName              = supplied

[req]
default_bits        = 4096
distinguished_name  = req_distinguished_name
string_mask         = utf8only
default_md          = sha384
x509_extensions     = v3_ca

[req_distinguished_name]
countryName                     = Country Name (2 letter code)
stateOrProvinceName             = State or Province Name
organizationName                = Organization Name
commonName                      = Common Name

[v3_ca]
subjectKeyIdentifier = hash
authorityKeyIdentifier = keyid:always,issuer
basicConstraints = critical, CA:true
keyUsage = critical, digitalSignature, cRLSign, keyCertSign

[v3_intermediate_ca]
subjectKeyIdentifier = hash
authorityKeyIdentifier = keyid:always,issuer
basicConstraints = critical, CA:true, pathlen:0
keyUsage = critical, digitalSignature, cRLSign, keyCertSign
Sign the Root CA Certificate
openssl req -config /root/ca/openssl-root.cnf \
  -key /root/ca/private/root-ca.key \
  -new -x509 -days 7300 -sha384 \
  -extensions v3_ca \
  -out /root/ca/certs/root-ca.crt

# Verify it
openssl x509 -noout -text -in /root/ca/certs/root-ca.crt
Congratulations. You now have a Root CA. It should say CA:TRUE in the Basic Constraints and have a validity of 20 years. Copy the certificate (NOT the key) to a USB drive — you’ll need it on the Issuing CA machine.
Step-by-Step: Building the Issuing CA
This runs on a proper server. It needs network access because it’s going to be issuing certificates to your infrastructure.
Generate the Issuing CA Key and CSR
# On the Issuing CA server
mkdir -p /etc/pki/issuing-ca/{certs,crl,newcerts,private,csr}
chmod 700 /etc/pki/issuing-ca/private

# Generate key
openssl genrsa -aes256 -out /etc/pki/issuing-ca/private/issuing-ca.key 4096

# Generate CSR (Certificate Signing Request)
openssl req -config /etc/pki/issuing-ca/openssl-issuing.cnf \
  -key /etc/pki/issuing-ca/private/issuing-ca.key \
  -new -sha384 \
  -out /etc/pki/issuing-ca/csr/issuing-ca.csr
Sign the Issuing CA Certificate with the Root CA
Take the CSR to the air-gapped Root CA machine (via USB drive). Sign it there:
# On the Root CA machine
openssl ca -config /root/ca/openssl-root.cnf \
  -extensions v3_intermediate_ca \
  -days 3650 -notext -md sha384 \
  -in /path/to/issuing-ca.csr \
  -out /root/ca/certs/issuing-ca.crt
Copy the signed certificate back to the Issuing CA server. Your Issuing CA is now trusted by the Root.
Create the Certificate Chain File
# On the Issuing CA server
cat /etc/pki/issuing-ca/certs/issuing-ca.crt \
    /etc/pki/issuing-ca/certs/root-ca.crt \
    > /etc/pki/issuing-ca/certs/ca-chain.crt
This chain file is what you’ll distribute to clients. It lets them verify the full trust path: End Entity → Issuing CA → Root CA.
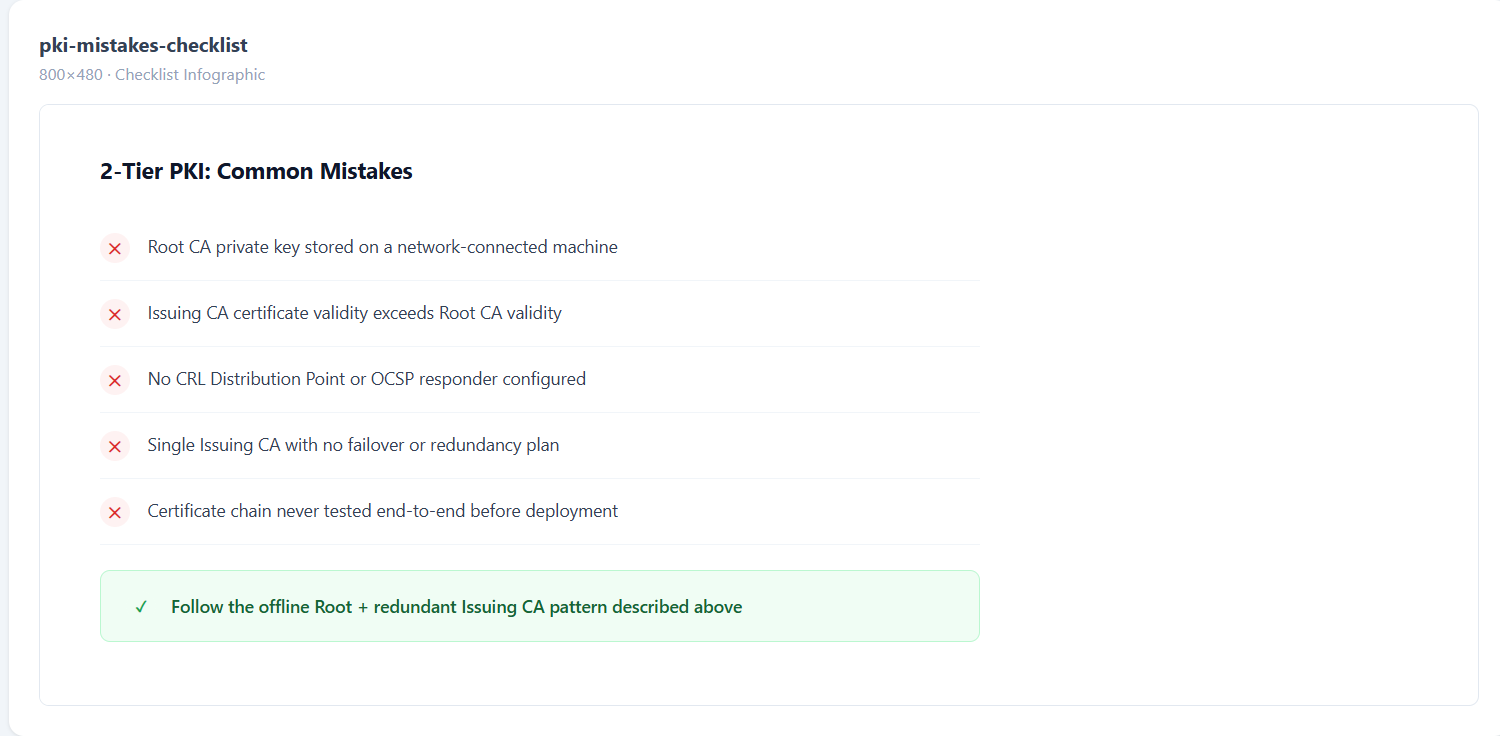
The Mistakes That Will Wake You Up at 2 AM
I’ve seen every one of these in production. Learn from other people’s pain.
Mistake 1: Root CA key on a network-connected machine. Just don’t. The moment that key touches a network, your entire PKI is one exploit away from total compromise.
Mistake 2: Issuing CA validity longer than Root CA. If your Root expires before your Issuing CA, the chain breaks. Always: Root > Issuing > End Entity in validity period.
Mistake 3: No CRL or OCSP distribution point. You issued a certificate to a compromised server. How do clients know it’s revoked? Without CRL/OCSP, they don’t. They’ll happily trust it forever.
Mistake 4: Single Issuing CA with no redundancy. Your Issuing CA goes down. Now nobody can get new certificates. ACME renewals fail. Services start dropping. Have at least a plan for a second Issuing CA.
Mistake 5: Not testing the chain. You built it, deployed it, and never verified that a client can actually validate the full chain. Test with openssl verify -CAfile ca-chain.crt end-entity.crt before you deploy anything.
What About Automation?
A 2-tier PKI is the foundation. But manually issuing certificates from it? That doesn’t scale past 50 certs. You need:
- ACME protocol for automated TLS certificate issuance and renewal
- SCEP/EST for device enrollment
- Certificate lifecycle management to track what’s issued, what’s expiring, and what needs rotation
- Monitoring to alert you before certificates expire (not after)
This is where a platform like QCecuring’s PKI-as-a-Service fits — it handles the Issuing CA layer with built-in automation, multi-CA support, and integration with your existing infrastructure. You keep your offline Root CA (the trust anchor), and the platform handles everything downstream.
Quick Reference: Key Decisions
| Decision | Recommendation |
|---|---|
| Root CA key algorithm | RSA 4096 or EC P-384 |
| Root CA validity | 20 years |
| Issuing CA validity | 5-10 years |
| End entity validity | 90 days - 1 year |
| Hash algorithm | SHA-384 (SHA-256 minimum) |
| Root CA storage | Air-gapped + HSM |
| CRL publish interval | Every 6 months (Root), every 24h (Issuing) |
| Number of Issuing CAs | 2 minimum (redundancy) |
Wrapping Up
A 2-tier PKI isn’t complicated. It’s just disciplined. Keep the Root offline, let the Issuing CA do the work, automate everything downstream, and test your chain before you deploy.
The hardest part isn’t the technical setup — it’s convincing your team to actually keep the Root CA offline and not “just quickly connect it to sign one more thing.” That one shortcut is how PKIs die.
If you’re building this from scratch and want to skip the operational overhead of running your own Issuing CA infrastructure, request a demo and we’ll show you how QCecuring handles the heavy lifting while you maintain full control of your trust hierarchy.